Oil and Gas Well Drilling and Servicing eTool
Oil and Gas Well Drilling and Servicing » Well Completion


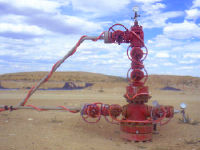
Once the design well depth is reached, the formation must be tested and evaluated to determine whether the well will be completed for production, or plugged and abandoned. To complete the well production, casing is installed and cemented and the drilling rig is dismantled and moved to the next site. A service rig is brought in to perforate the production casing and run production tubing. If no further pre-production servicing is needed, the christmas tree is installed and production begins. After production starts, the well may need further servicing. If it's decided that the well will not be completed, then it will be plugged and abandoned.
Hazards may be related to the following:

To determine the potential of a producing formation, the operator may order a drill stem test (DST). The DST crew makes up the test tool on the bottom of the drill stem, then lowers it to the bottom of the hole. Weight is applied to the tool to expand a hard rubber sealer called a packer. Opening the tool ports allows the formation pressure to be tested. This process enables workers to determine whether the well can be produced.
Potential Hazards
- Being pinched or struck by the drill stem test tools during floor operations.
- Swabbing the hole on the way out with the test tool could cause a kick to occur, which could result in a blowout leading to injuries and deaths.
- Being exposed to unexpected release of H2S or other gases or liquids.
- A packer seat failure or fluid loss to an upper formation could cause a kick that might result in a blowout causing injuries and deaths.
- Other hazards are similar to those encountered during trippingout/in.
Possible Solutions
- Wear appropriate personal protective equipment.
- Instruct workers in handling and using the special tools required during drill stem testing.
- Keep a method for filling the hole in place at all times. Before any test starts, the rig management must ensure that the blow-out prevention system includes a kill system that is capable of pumping fluid into the well below the annular preventer and at least on-set of pipe rams.
- Run a pump-out-sub or downhole circulating device in the test string to to enable the system to be reversed.
- Ensure all workers on the location understand the dangers before starting any drill stem test. They should be fully informed of and trained in appropriate safety procedures, including the use of safety equipment and breathing apparatus. If in an H2S area, post a sign indicating the test in full view for the general public to see. Post reliable people to stop them from coming to the location. Define a minimum of two muster points with all vehicles parked in an appointed area.

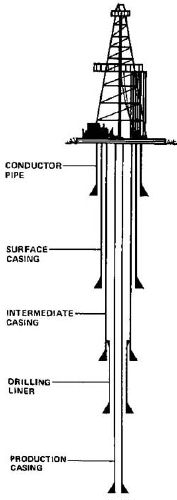
Production casing is the final casing in a well. It can be set from the bottom to the top. Sometimes a production liner is installed.
This casing is set the same as other casings, then cemented in place.
See Casing Operations and Cementing for more information on specific hazards and solutions.
#56. Surface Casing
Usually the first casing to be run in a well. This is done after spudding-in so a blowout preventer can be installed before drilling is started.†


A well is usually produced through tubing inserted down the production casing. Oil and gas is produced more effectively through this smaller-diameter tubing than through the large-diameter production casing.
Joints of tubing are joined together with couplings to make up a tubing string. Tubing is run into the well much the same as casing, but tubing is smaller in diameter and is removable.
The steps for this activity are:
- Tubing elevators are used to lift tubing from the rack to the rig floor.
- The joint is stabbed into the string, which is suspended in the well, with air slips.
- Power tongs are used to make-up tubing.
- This process is repeated until tubing installation is complete.
- The tubing hanger is installed at the wellhead.
New technology allows tubing to be manufactured in a continuous coil, without joints. Coiled tubing is inserted into the well down the production casing without the need for tongs, slips, or elevators, which takes considerably less time to run.
Potential Hazards
- Getting pinched fingers and hands from tongs and slips.
- Being struck by swinging tubing and tubing elevators.
- Getting caught between the joint and tongs or stump.
- Being struck by the tubing hanger wrench if it should slip.
- Getting fingers and hands pinched and caught between tubing hanger and tubing head.
Possible Solutions
- Keep all fingers and hands away from pinch points.
- Instruct workers to be on alert when on the rig floor and pipe racking area.
- Avoid placing hands on the end of the tubing stump.
- Use the correct tools for each task.
- Inspect the tools before use.
- Use coiled tubing.

Production flow is started by washing in the well and setting the packer. Washing in means to pump in water or brine to flush out the drilling fluid. Usually this is enough to start the well flowing. If not, then the well may need to be unloaded. This means to swab the well to remove some of the brine. If this does not work the flow might be started by pumping high-pressure gas into the well before setting the packer.
If the well does not flow on its own, well stimulation or artificial lift may need to be considered.
Potential Hazard
- A blowout may be possible whenever well pressures are changed.
Possible Solution
- Monitoring of well pressures and working blow out preventers (BOP's) are the best way to prevent blowouts.

Hydraulic fracturing is a well stimulation technique in which fluid is pumped under high pressure through well casing perforations to break up an otherwise impermeable shale formation. Hydraulic fracturing occurs during the well completion phase.
Hydraulic fracturing generally involves the following activities:
- Rig Up
- Well and Equipment Testing
- Perforating
- Fracturing Fluid Blending and Pumping
- Isolation
- Flowback
Rig Up
Rig up is the transport and assembly of equipment and materials to perform hydraulic fracturing operations. Hydraulic fracturing operations require more equipment on the well pad than conventional well completion. Due to the additional equipment, walking and working surfaces become even more restricted.

Potential Hazards
- Falling from heights.
- Slips, trips and falls.
- Struck-by moving vehicles, equipment and pressure; falling or dropped equipment; and flying particles.
- Caught-in or between pinch points (such as hammer union wings and hammers, pump iron and racks).
- Fires and explosions.
- Inhaling respirable crystalline silica (see OSHA-NIOSH's Hazard Alert).
- Inhaling diesel particulate.
- Exposure to concentrated chemical additives.
- Exposure to high noise levels.
- Overexertion or receiving sprains and strains while handling materials (such as sacks and buckets).


Possible Solutions
- Preplan equipment locations and use a spotter to position equipment out of the fall lane of the derrick and upwind of vents, vapor sources and gas sources.
- Conduct a pre-job inspection to identify and eliminate or correct hazardous work surfaces.
- Use appropriate fall protection equipment.
- Require all non-essential personnel to stand clear of the work zone.
- Secure all elevated lines.
- Use proper hand and body positioning.
- Provide adequate bonding and grounding for blending, pumping and sand transfer equipment.
- Use hose covers or shielding for transfer or suction lines containing flammable liquids to prevent them from being ruptured resulting in fires or explosions.
- Cap unused fill ports (e.g., cam lock caps) on sand movers.
- Reduce the drop height between the sand transfer belt and T-belts and blender hoppers.
- Apply fresh water to roads and around the well site to reduce silica dust.
- Enclose points where silica dust is released. Use local exhaust ventilation to collect silica-containing dusts and prevent dust escape. Install dust collection systems onto machines or equipment that release dust.
- Where possible, use enclosed cabs or booths. Consider providing operator cabs and booths with HEPA filters and climate controls to protect workers from silica dust and environmental extremes.
- Replace proppant transfer belts with screw augers.
- Ensure that workers follow the safe handling procedures found in Safety Data Sheets (SDSs1).
- Conduct personal protective equipment assessments and require employees to wear prescribed personal protective equipment including respiratory and hearing protection.
- Use mechanical lifting aids, proper lifting techniques and team lifting where appropriate.
See also Transporting Rig and Rigging Up.
1 Formerly referred to as Material Safety Data Sheets, MSDSs.
Well and Equipment Testing
Before the hydraulic fracturing job begins, well servicers conduct a pressure test on the system. The pressure test is conducted by pumping fresh water, brine or drilling mud into the well to gradually increase the pressure. The pressure test involves the gradual increase of hydraulic pressure on the system. The final test pressure is above the maximum fracturing pressure, but below the lowest component failure pressure.
Potential Hazards
- Struck-by high-pressure lines or unexpected release of pressure (for example, mismatched or excessively worn hammer unions and line leaks or line failure).
- Rotating equipment hazards.
- Inhaling diesel particulate.
- Exposure to high noise levels.
Possible Solutions
- Fasten high-pressure lines together properly.
- Use proper equipment inspection techniques that include hammer unions.
- Require all non-essential personnel to stand clear.
- Direct equipment operators to remain at their controls.
- Use proper equipment guards and covers.
- Wear proper personal protective equipment, such as respiratory, skin and hearing protection, as appropriate for the hazards present.
Perforating
The fracturing job begins by perforating the well casing. See Perforating for more information.

Fracturing Fluid Blending and Pumping
After perforating the well casing, workers blend and pump fracturing fluid into the well through high pressure lines. Fracturing fluid is made up of a base fluid, proppant (sand, or an alternative proppant), and chemical additives (see Fracturing Fluid). The blender and pump trucks run simultaneously for several hours while workers monitor well pressure and fracture progression.
Potential Hazards
- Slips, trips and falls.
- Struck-by high-pressure lines or an unexpected release of pressure (for example, mismatched or excessively worn hammer unions and line leaks or line failure).
- Rotating and moving equipment hazards.
- Fires, explosions and uncontrolled chemical reactions.
- Inhaling respirable crystalline silica.
- Inhaling diesel particulate.
- Exposure to concentrated chemical additives.
- Exposure to high noise levels.
- Overexertion or suffering sprains and strains during material handling such as sacks and buckets.

Possible Solutions
- Conduct a pre-job inspection to identify and eliminate or correct hazardous work surfaces.
- Require all non-essential personnel to stand clear of the work zone.
- Fasten high-pressure lines together properly.
- Conduct adequate pressure tests on pump(s) and lines and ensure proper valve alignment before pumping. Install a check valve as close to the wellhead as possible.
- Use proper equipment inspection techniques that include hammer unions.
- Direct equipment operators to stay by their controls.
- Use proper equipment guards and covers.
- Provide adequate bonding and grounding for blending, pumping and sand transfer equipment.
- Use hose covers or shielding for transfer or suction lines containing flammable liquids to prevent them from being ruptured resulting in fires or explosions.
- Substitute less hazardous materials, as practicable.
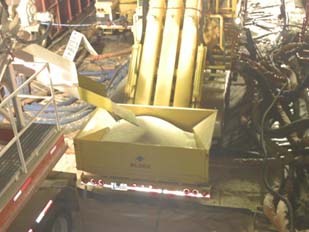
- Require the capping of unused fill ports (e.g., cam lock caps) on sand movers.
- Reduce the drop height between the sand transfer belt and T-belts and blender hoppers.
- Apply fresh water to roads and around the well site to reduce silica dust.
- Enclose points where silica dust is released. Use local exhaust ventilation to collect silica-containing dusts and prevent dust escape. Install dust collection systems onto machines or equipment that release dust.
- Where possible, use enclosed cabs or booths. Consider providing operator cabs and booths with HEPA filters and climate controls to further protect workers.
- Replace proppant transfer belts with screw augers on sand movers in new designs or retrofits.
- Ensure that workers follow the safe handling procedures found in SDSs.
- Use proper mixing procedures.
- Wear appropriate personal protective equipment, including respirators and eye, face and hearing protection.
- Provide an eyewash station and other appropriate flushing equipment as recommended by the SDS.
- Use mechanical lifting aids, proper lifting techniques and team lifting where appropriate.

Isolation
Once a stage is fully fractured, workers isolate it from the rest of the well by inserting a plug into the well. This requires wireline operations. See Wireline Operations for more information.
Flowback2
After the entire well has been fractured, workers decrease the pressure at the wellhead and drill out the isolation plugs. A mixture of fracturing fluid and gas or oil flows back out of the well through flow lines into pits or tanks.
Drilling out the plugs will require wireline operations, snubbing, or coil tubing procedures. See Wireline Operations, Snubbing, Coil Tubing for further information.
Potential Hazards
- Struck-by high-pressure lines.
- Fires and explosions.
- Inhaling hazardous gases or vapors.
- Exposure to high noise levels.
Possible Solutions
- Direct all non-essential personnel to stand clear.
- Follow procedures to release trapped pressure safely.
- Ground and bond tanks used to hold flowback fluid (frac tanks).
- Route flowback fluid through a gas buster system.
- Use wood gauges to monitor fluid volume in frac tanks.
- Use lower explosive limit (LEL) monitors to warn of the presence of flammable gases.
- Wear proper personal protective equipment, such as respiratory, skin and hearing protection, as appropriate for the hazards present.
2 For the purposes of this eTool, flowback is considered part of the hydraulic fracturing process. This perspective is not shared by the entire industry.


If the well doesn't produce adequately, a beam pumping unit may be installed.
There are four basic types of beam pumping units. Three involve a walking beam, which seesaws to provide the up and down reciprocating motion to power the pump. The fourth reciprocates by winding a cable on and off a rotating drum. The job of all four types is to change the circular motion of an engine to the reciprocating motion of the pump.
The pump units are brought in disassembled on trucks and off-loaded onsite. The many parts of the pump unit include large heavy metal pieces that need to be assembled.
Potential Hazard
- Being pinched, struck, or crushed by falling or swinging parts during assembly.
Possible Solutions
- Ensure that the work crew understands the assembly procedures and hazards involved in the tasks.
- Wear appropriate personal protective equipment.

